Introduction
I thought to start making How To Make Animation in PowerPoint tutorials in a new way by writing the entire script first and then recording the audio. That way, I feel, maybe you will notice a bit more confidence in my voice and hopefully, I might be able to teach in a much better way.
So, with lots of silence, headphones in the ears, and feeling relaxed with meditation music; will try to explain the importance of using Vector Files in Microsoft PowerPoint to create stunning animation effects. Adobe Illustrator will be used as a helping hand to convert Vector Files into a proper SVG Format (Scalable Vector Graphics), which we later will import into PowerPoint.
PowerPoint and Graphics Designing
If you have watched some of my previous PowerPoint Animation Tutorial Videos then you might know that most of the time, I use Shape Tools to draw all the characters and the entire scene and later I use Entrance, Emphasis, Exit, and Motion Paths animation effects to add motion to them. See Figure 1.1 for an example, where the entire Girl Character has been drawn using Shape Tools.

As I always said Graphics Design takes much of the time than animating the objects. Most of the learners don’t want to spend much time drawing characters using Shape Tools.
So, in this long tutorial which is more theoretical than practical, I will try to explain a few image file types that might help you to ease the graphics designing process by using ready-made vector files. Of course, we are going to use other people’s works, so don’t forget to give credit.
Adobe Illustrator will only be used to select specific layers of the vector files and convert them to SVG Format to later import into Microsoft PowerPoint. That way, you will be able to ungroup all the layers and can then apply specific animation effects to individual layers. In PowerPoint, we call them the Objects.
The Freepik – A treasure of free Graphics Resources
I don’t think this article was even possible without the help of Freepik.com, which provides you with millions of free graphics files in 4 popular file formats: Vectors, Photos, PSD, and Icons. You can create a Free Account on this website to use resources by attributing the Real Author. If you want to use the contents without attribution then you can go for a Premium Freepik account.

On Freepik, you can either Sign Up for a new account or you can even use your Google, Facebook, and Twitter to log in without the need of making a new account. The login credentials of the said services can be used to log in to Freepik by authorizing access.

You can search for thousands of Vector Files made available by great minds from all around the world. You can even use filters to limit the search, like File TypeVector Files and License Free. Searching without a filter will display all types of content like Images, Icon Files, Photoshop (PSD – Layered Images), or Vector Files.
So, if we search for “Walk Pose Animation in PowerPoint”, then you can find 100s of free vector files, mostly available in AI and EPS format with different layers that can later easily be modified with PowerPoint.
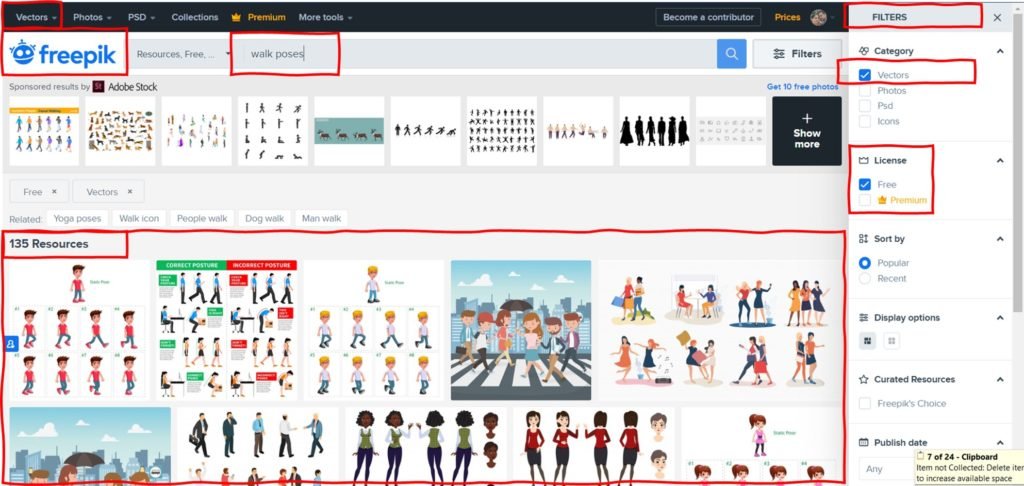
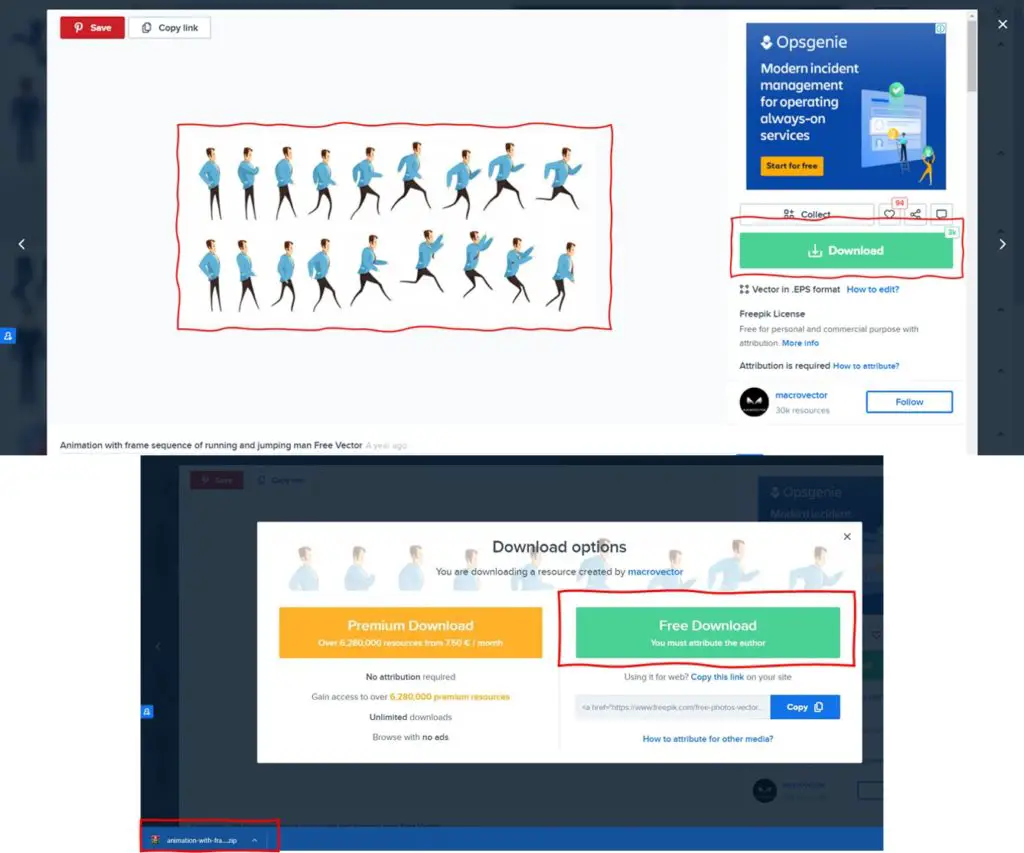
After selecting one of the images and clicking the Download button, it will ask you if you want to use that file for Free with attribution or if you can go for a Premium Account without attribution.
Most of these downloaded files will be in a compressed file format and you can use Windows Zip to extract the contents. After unzipping the file, you may find more than one file type of the same image as for this Running and Jumping Man Walk Pose, we have two different types of files: EPS and JPG.
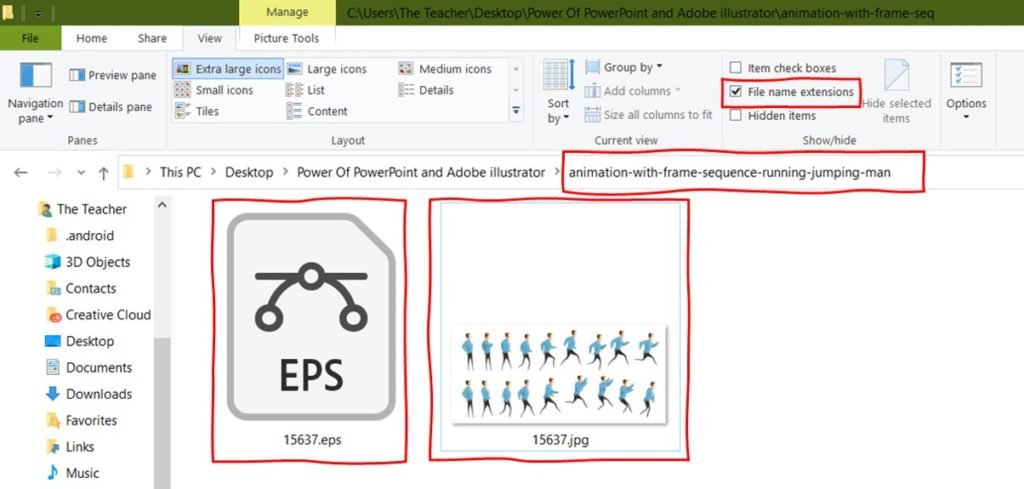
Keep in mind that you cannot use the JPG file type of the running and jumping man image in PowerPoint as it is a single image file. To animate this character by applying PowerPoint animation effects, we need each of the runnings and jumping poses as a separate object.
What are Vector Files?
In short, Vector Files are constructed through some kind of mathematical formulas instead of pixels that you see in other file types like JPG, GIF, or PNG. The most loveable thing about the vector is that you can scale them without compromising with clarity and resolution. Figure 1.7 illustrates that the quality or resolution is not lost when you increase the size:
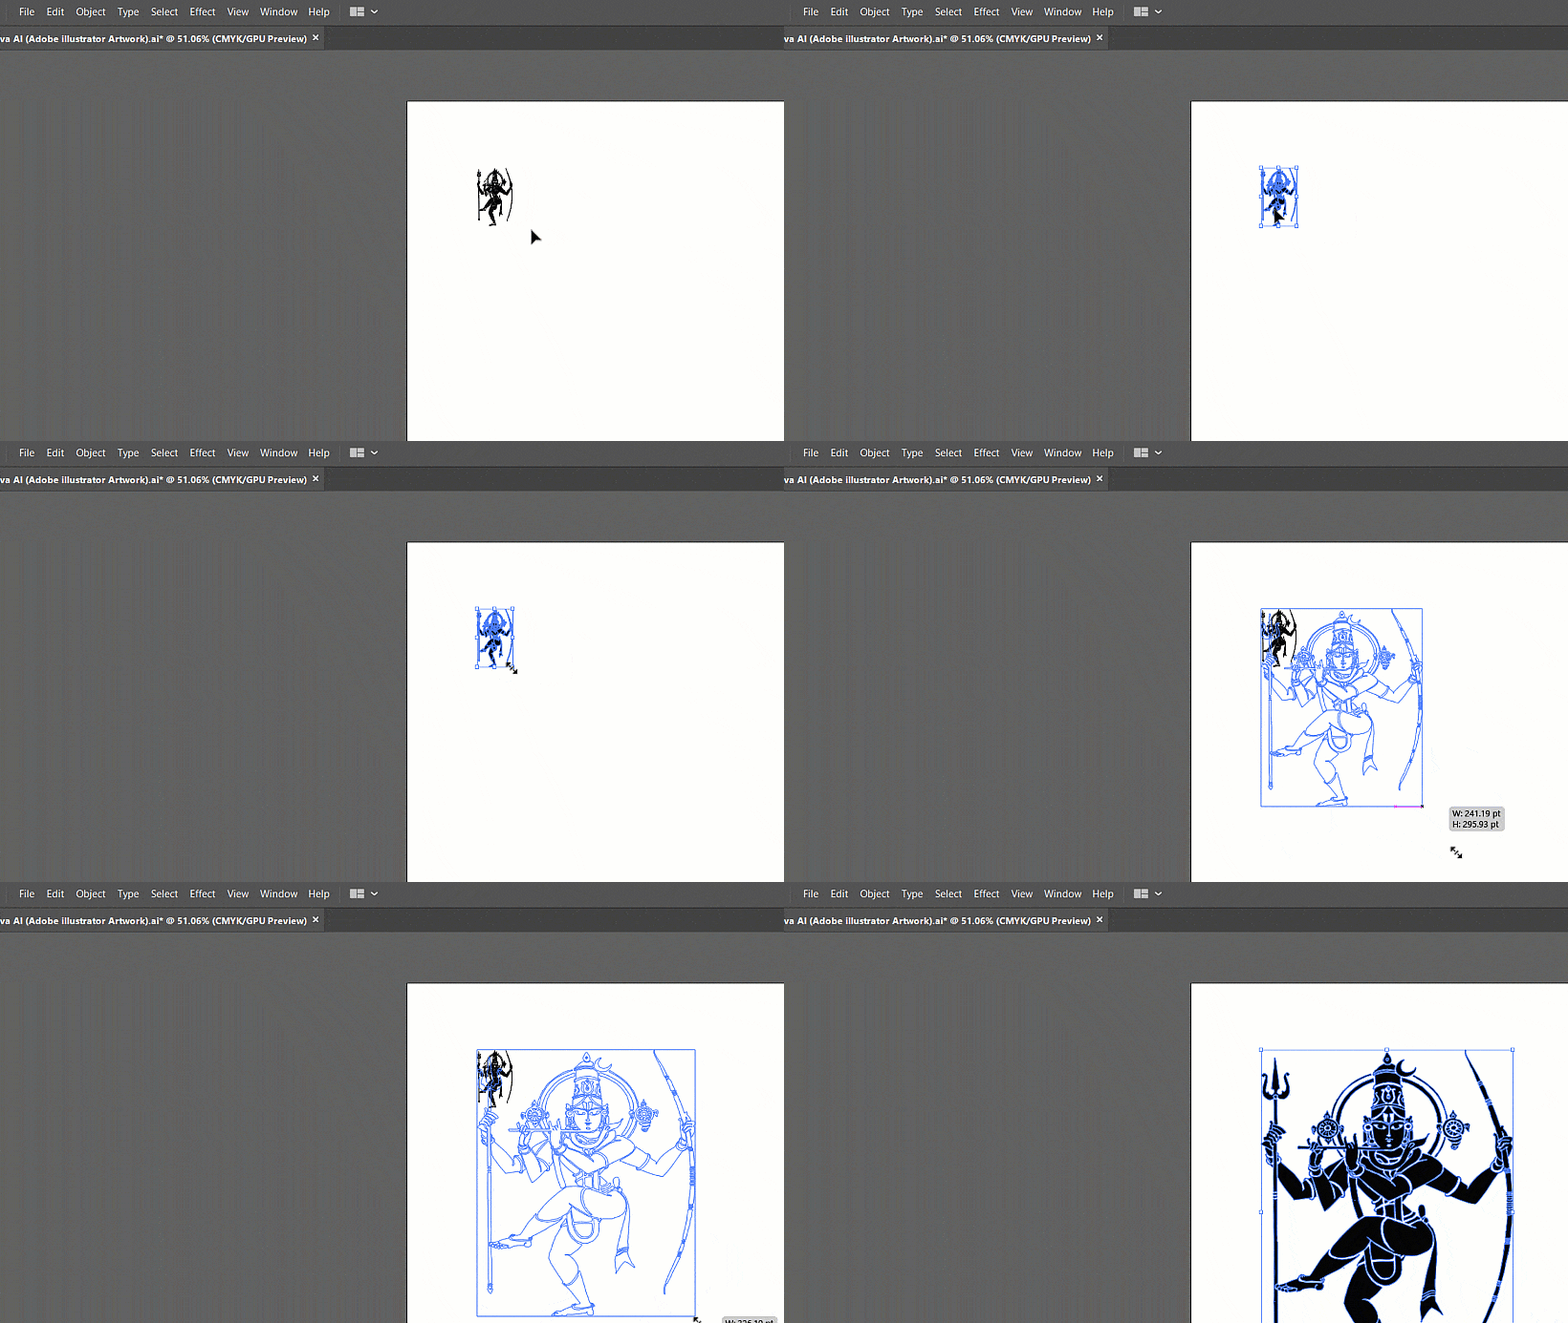
AI File Type. Size increased in Adobe Illustrator and resolution is safe.
That also applies to Microsoft PowerPoint, where you can also scale characters or objects made with PowerPoint Shape Tools to a large extent without losing the quality or resolution.
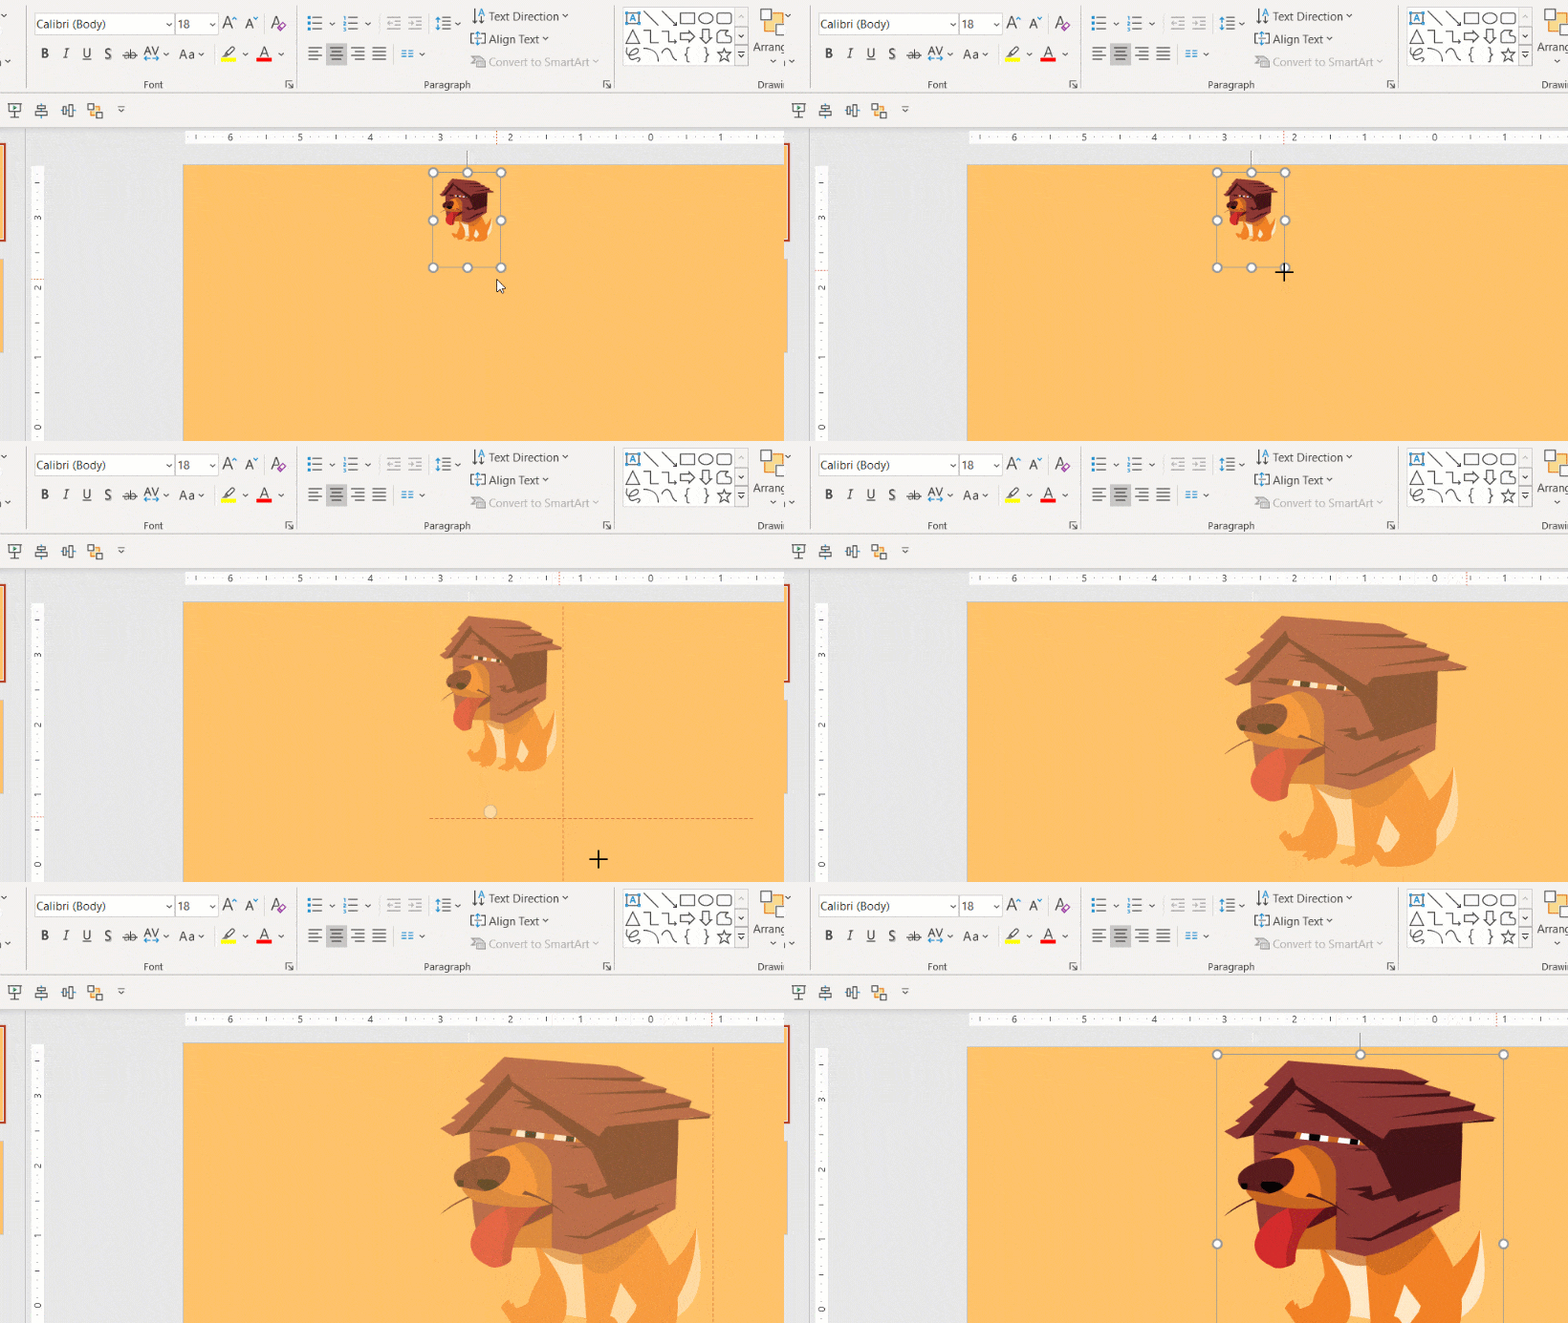
Microsoft PowerPoint Shape Tools just work similarly to Vector Graphics. The quality is preserved when the size is extended.
The most popular vector file types are AI and EPS, most of which are created with Adobe Illustrator. But that is not the case with JPEG File Types and when you try to increase the size of a small pixel image then, of course, you will lose the quality. See Figure 1.9:
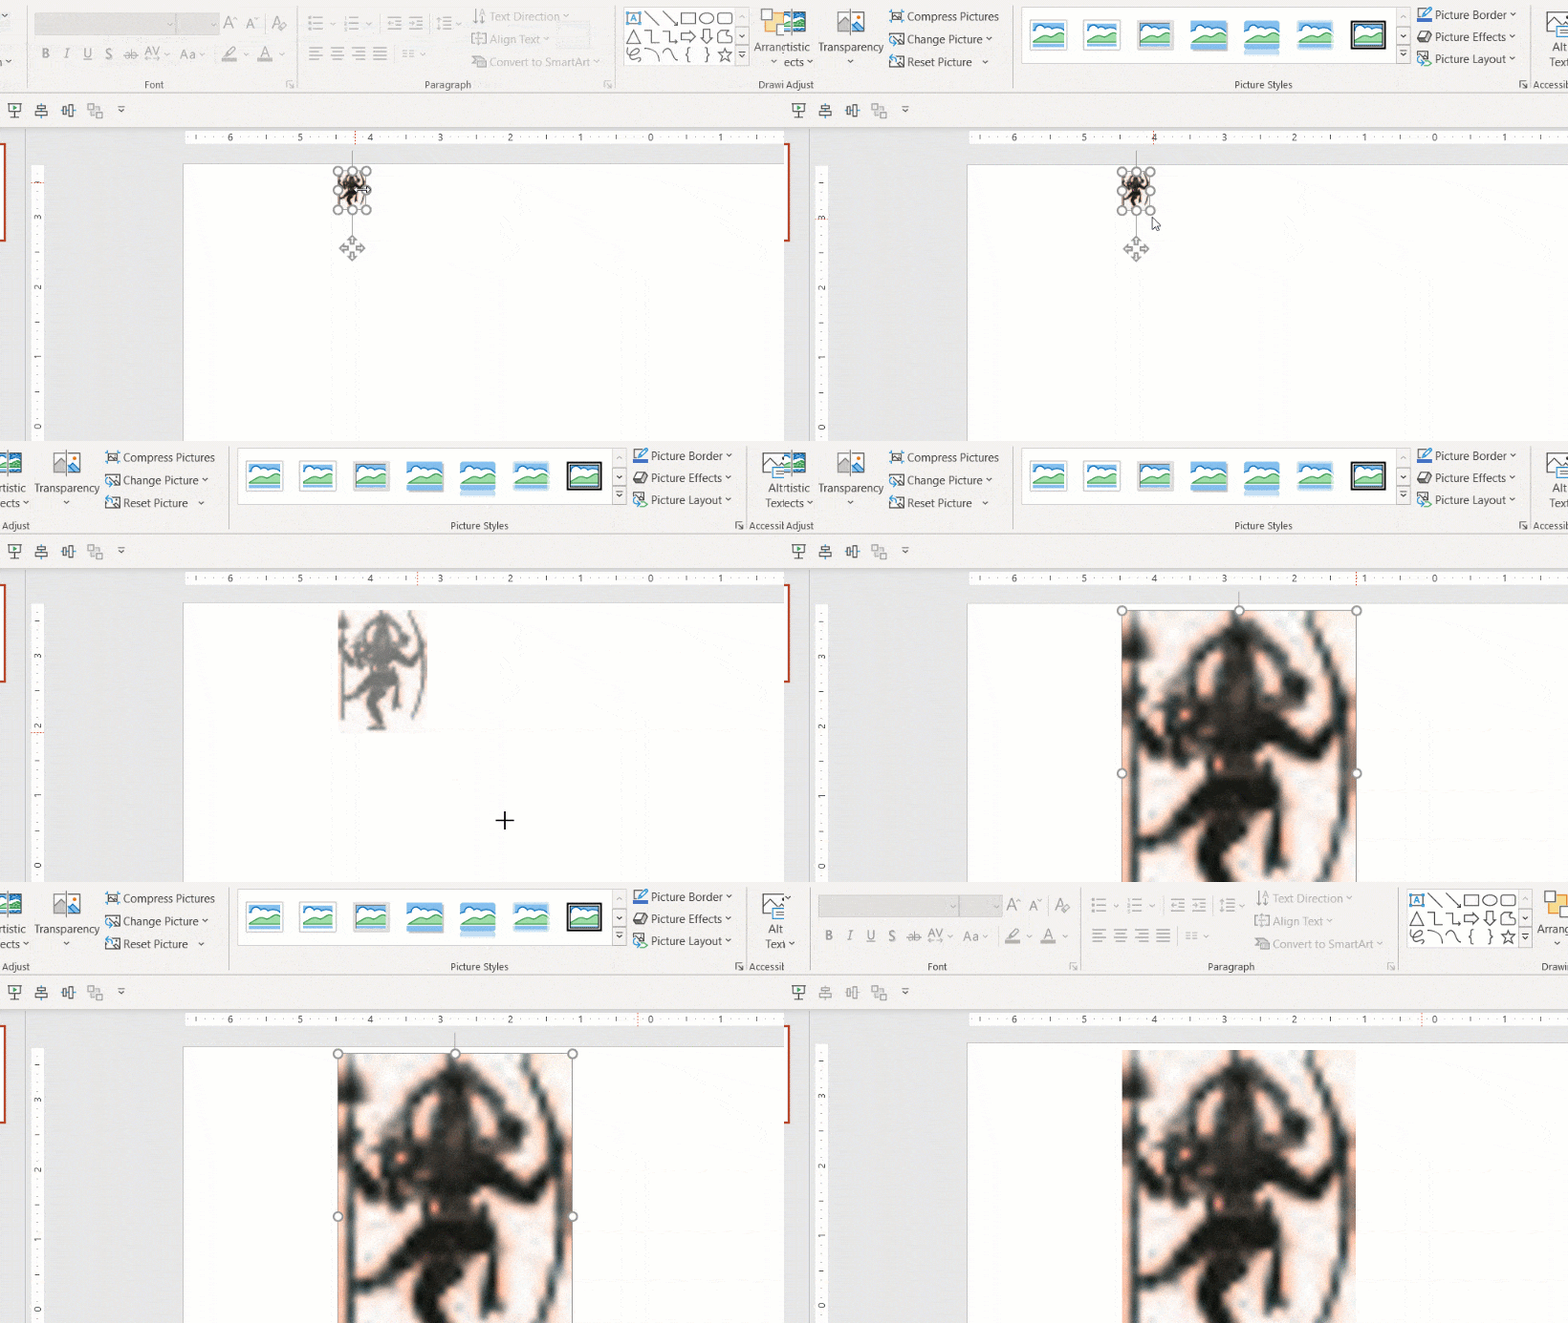
The same image in JPEG Format is losing the resolution upon size extension.
Microsoft PowerPoint and Vector File Types?
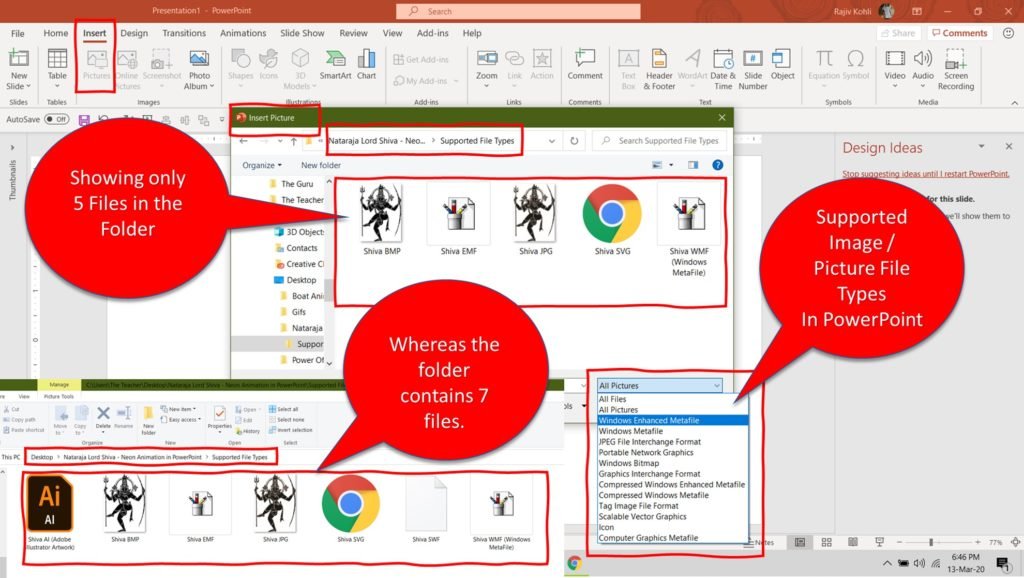
First, you need to understand what Image File Types Microsoft PowerPoint supports. So, if you click on the Insert tab – Pictures and then click the File Types drop-down button, you will see a list of all types of Image Files that can be inserted into your slide.
As most of the vector files that you will download from Freepik will be in EPS or AI format, so you will not be able to insert them into PowerPoint. The only way to use these free vector files inside PowerPoint is to convert them into a vector format the PowerPoint supports like EMF or SVG.
Windows Enhanced Metafile (EMF), Windows MetaFile, and Scalable Vector Graphics are the most used file types for vector images, the layers of which can easily be ungrouped and modified in Microsoft PowerPoint. But you don’t see AI or EPS file types in the support PowerPoint Image File Type list.
The point is: you cannot insert AI or EPS File Types directly into your PowerPoint Slide as they are not supported.
How to Convert EPS to EMF / SVG File Format?
If you Google the above question then you can find 100s of websites that can convert one file type to another for free online but the layers of most of these vector files converted through free online services can break when inserted and ungrouped in PowerPoint.
You can try this free conversion option otherwise you have to use Adobe Illustrator to convert the downloaded vector files into WMF or SVG file format.

The Power Of PowerPoint and Adobe Illustrator
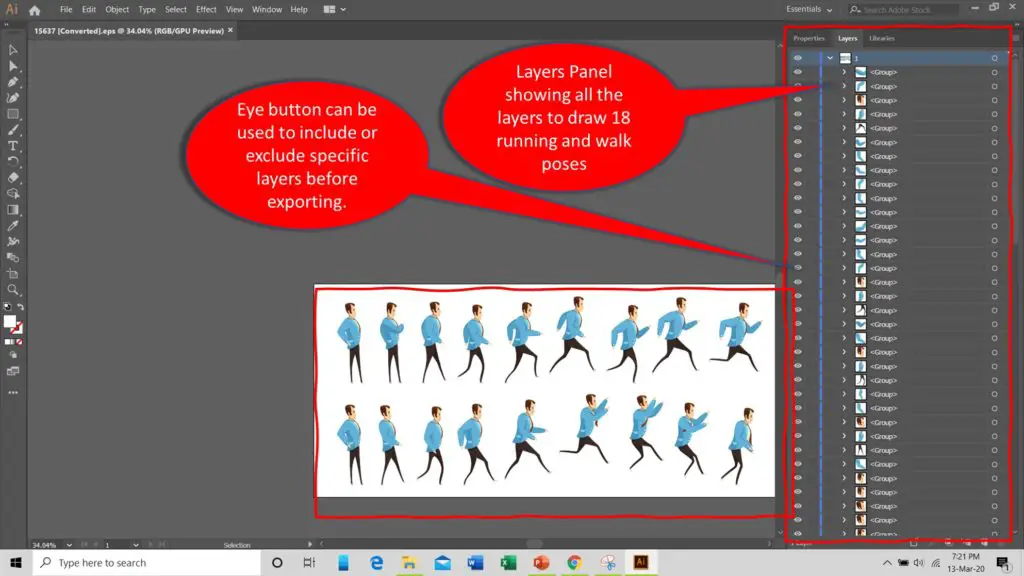
You can open the downloaded vector file in Adobe Illustrator after extracting the zip file that you download from Freepik in the previous steps. In the Layers Panel, you can be very specific about the image layers that you want to keep or remove by clicking on the Eye Button.
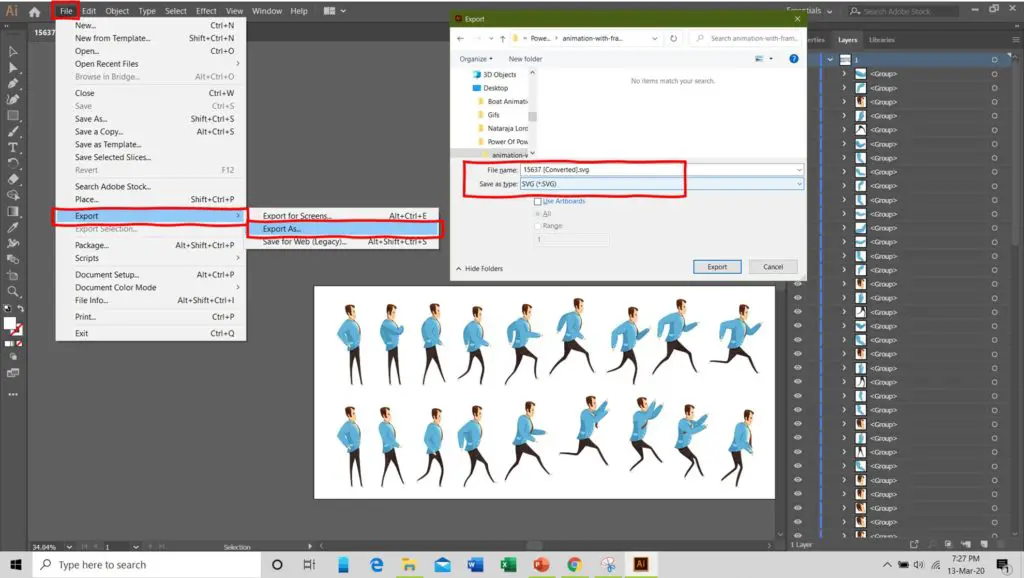
After hiding/showing required layers from the Layers Panel, you can go to the File menu – click Export, and choose the vector file type that we can use with PowerPoint.
A quick tip: SVG file type works best with Microsoft PowerPoint.
How To Make Animation in PowerPoint using Vector Files (SVG)?
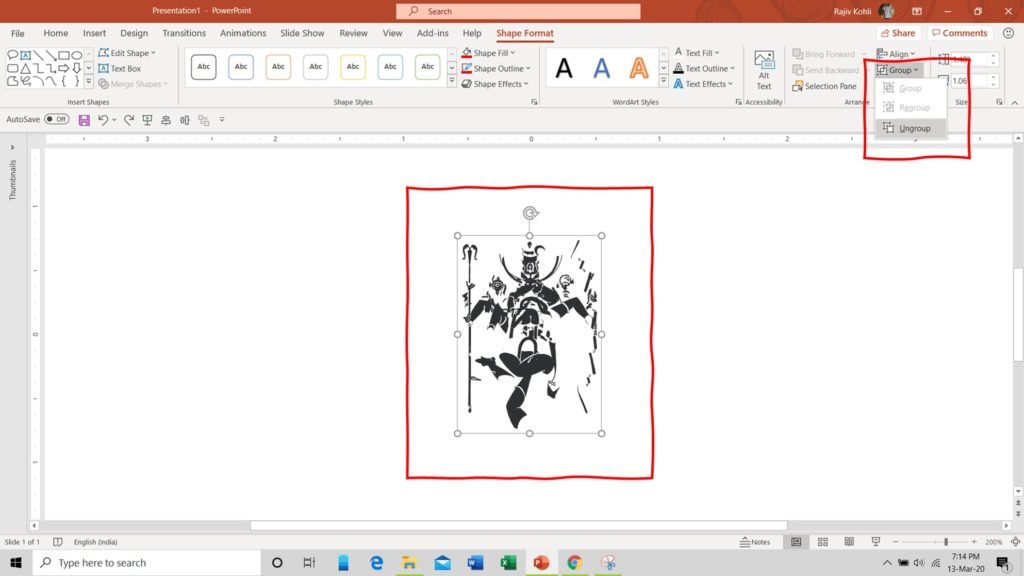
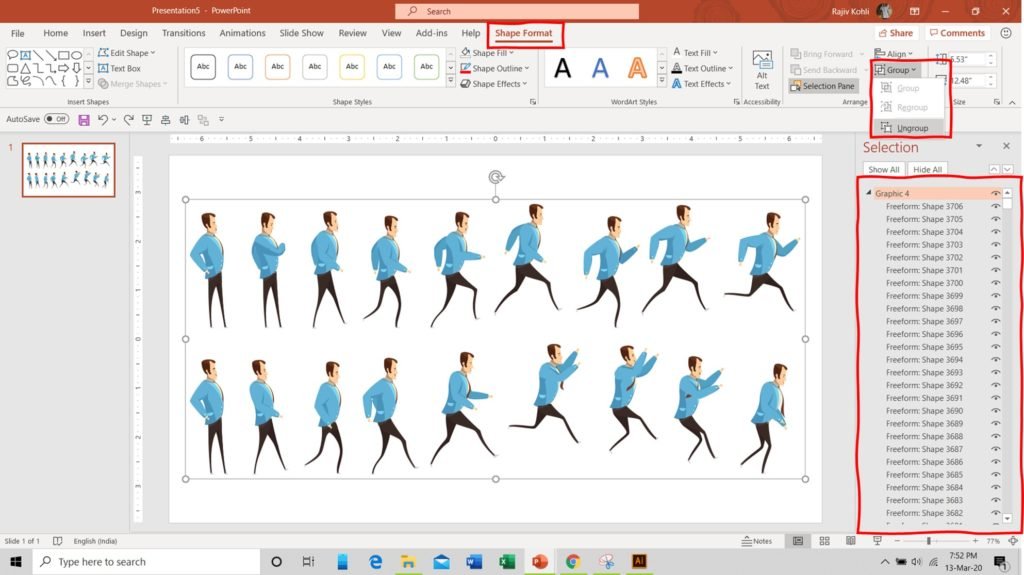
Now, if you insert the newly converted SVG file into PowerPoint then you can see a new Tab – Graphics Format in the Office Ribbon from where you can use the Ungroup command to break this single vector image into separate PowerPoint Shape Layers.
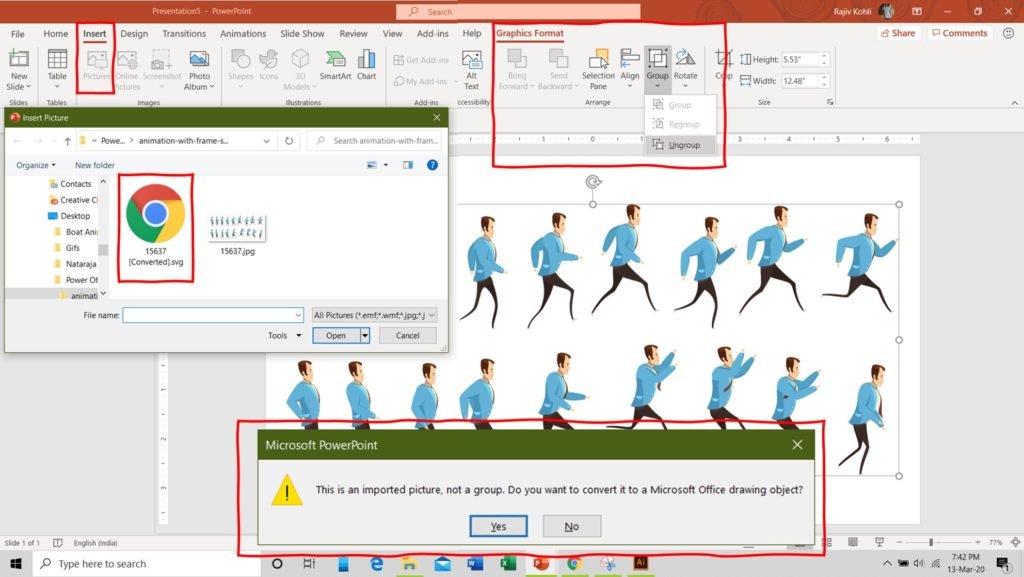
Keep in mind that, after using the Ungroup command from the Graphics Format menu, upon selecting the same image again, you will start seeing Shape Format instead Graphics Format tab as our image is now converted into Shape layers. You might need to use the Ungroup command from the Shape Format tab as well to further extract the layers within from sub-groups.
After ungrouping the SVG file, most of the EPS Layers will automatically get converted into the FreeForm Shape of PowerPoint that you can see in the Selection Pane. You might also find several subgroups under layers that you can also ungroup to have each layer as a separate shape layer in PowerPoint; depending on how and which object you want to animate.
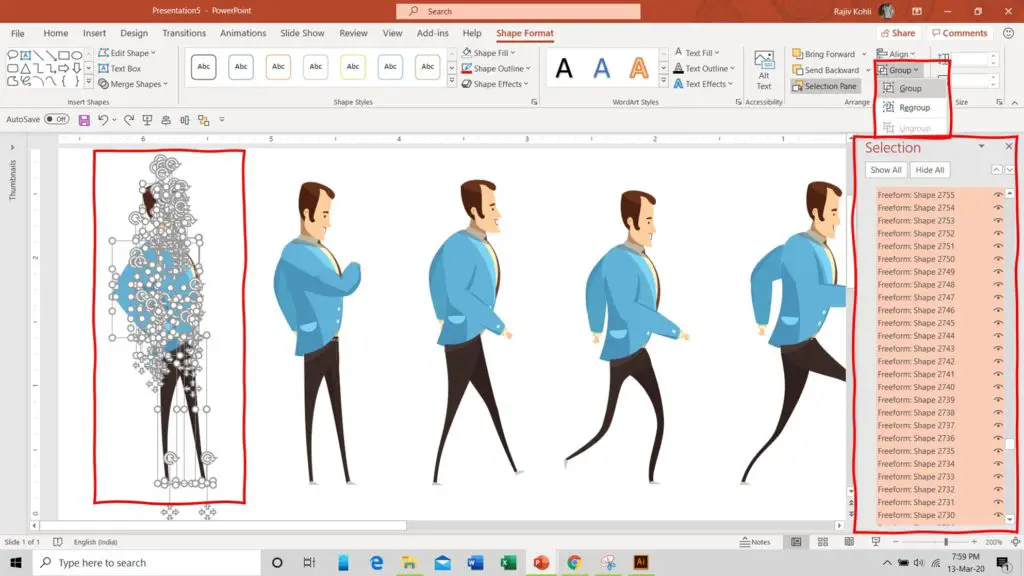
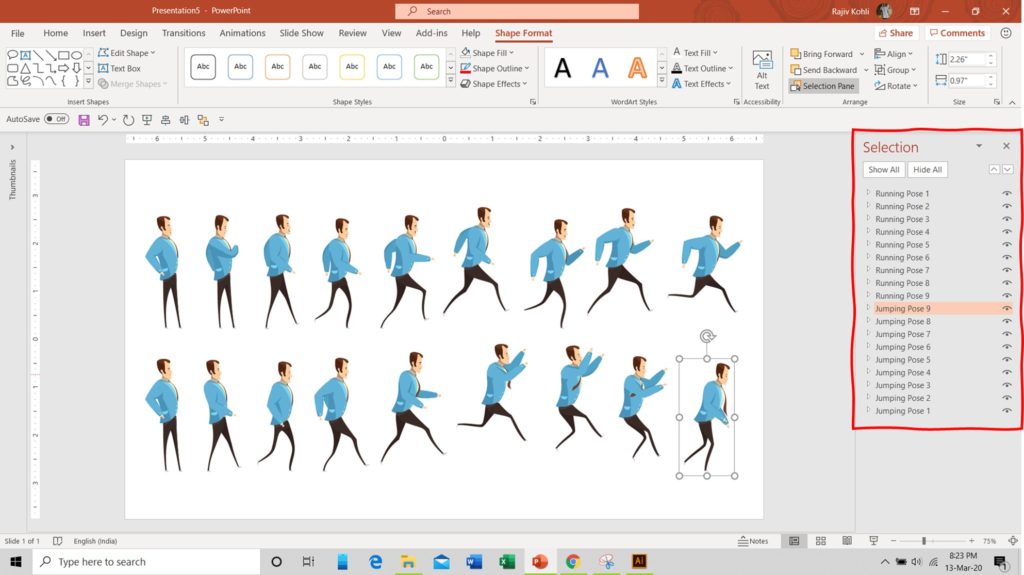
As each of the walks poses in the above picture is made of several Adobe Illustrator layers so after ungrouping the SVG file you get hundreds of FreeForm Shapes for each body part of the character. Figure 2.7 shows that all the layers of one walk pose have been selected and we will Group them into a single PowerPoint Object as we need each pose as a single object.
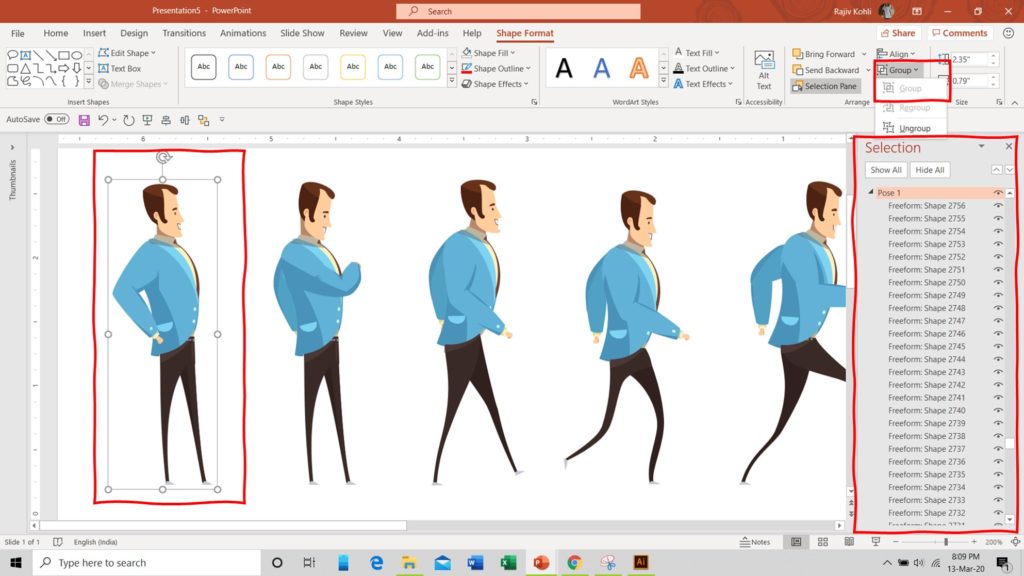
In Figure 2.8, you can see that all the layers of one walk pose have been grouped into a single PowerPoint Object and we named it Pose 1 through the Selection Pane. So, we will repeat the same steps to group all the layers of the specific walk pose to convert that into a single object. That way, we will have 18 different walks and running poses of the character. Don’t forget to name each pose!
Once you have all the shape layers ready then you can apply the desired animation effects as required on all these layers. I have already published a few tutorials on How To Make A Walk Cycle Animation in PowerPoint. So, as we have all the different walk poses of the character now available, we can use the Flash Once along with the Motion Paths animation effect to easily create the Walk Cycle in Microsoft PowerPoint.

I hope you got The Teacher Point.
Watch How To Make Animation in PowerPoint Using Vector Files Tutorial
The article How To Make Animation in PowerPoint using Vector Files also applies to the following versions:
- PowerPoint 2007
- PowerPoint 2010
- PowerPoint 2013
- PowerPoint 2016
- PowerPoint 2019
A Microsoft PowerPoint Animation Tutorial.


